Difference between revisions of "Vet App"
| (One intermediate revision by the same user not shown) | |||
| Line 139: | Line 139: | ||
[[File:vetapp22.png]] | [[File:vetapp22.png]] | ||
| + | |||
| + | |||
| + | === Support === | ||
| + | |||
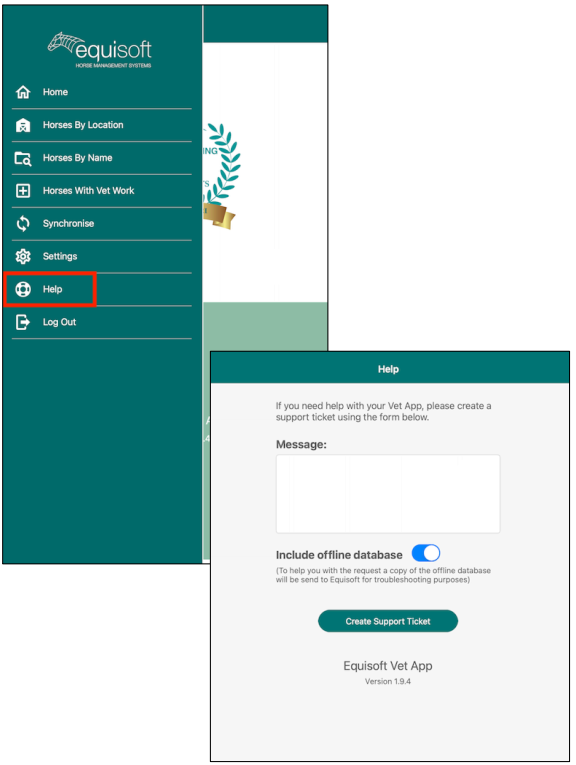
| + | If you require support or need to report an issue, please select Help from the dropdown menu and submit a ticket. | ||
| + | |||
| + | [[File:vetapp27.png]] | ||
| Line 167: | Line 174: | ||
You can see that the work input for today (4th August) appears in blue, with the schedule work for 6th August appearing in Yellow. | You can see that the work input for today (4th August) appears in blue, with the schedule work for 6th August appearing in Yellow. | ||
| + | |||
== Synchronise Work == | == Synchronise Work == | ||
| Line 179: | Line 187: | ||
[[File:vetapp20.png]] | [[File:vetapp20.png]] | ||
| + | |||
| + | |||
| + | == EquisoftLive Approve Vet Work == | ||
| + | |||
| + | Within EquisoftLive the user can review all of the work that has been uploaded by the Vet App user. | ||
| + | (The menu item is found under the “Activity” menu). | ||
| + | |||
| + | [[File:vetapp23.png]] | ||
| + | |||
| + | Both the Vet and Tease Items must be imported individually by clicking on the individual tabs 1 and 2 and Import Selected. By default, all the work that was uploaded from the Tablet/ Mobile has the “Import” flag ticked. | ||
| + | |||
| + | |||
| + | == EquisoftLive Commit Vet Work == | ||
| + | |||
| + | When the user clicks on “Import Selected” the Vet work is pushed to the Activity Input window. This work is now treated as any other work that has been input through this window. The user can edit the work if required and “Confirm” the work and commit it to the horse’s vet history record. | ||
| + | |||
| + | [[File:vetapp24.png]] | ||
| + | |||
| + | |||
| + | == Vet Worksheet Report == | ||
| + | |||
| + | Generate a daily vet worksheet by selecting Reports> Activity> Vet Worksheet> Show Report. | ||
| + | This report can be printed, downloaded and emailed if required. | ||
| + | |||
| + | [[File:vetapp25.png]] | ||
| + | |||
| + | [[File:vetapp26.png]] | ||
Latest revision as of 16:33, 1 March 2022
Contents
Vet App Summary
The Equisoft Vet App is used in conjunction with EquisoftLive and is designed to streamline activity input. Synchronise with your EquisoftLive account in seconds, giving you access to your horse records on the go. The App is fully supported by our online helpdesk and is accessible both online and offline.
Only 1 of the following conditions need to be met for the horse to be in the offline database:
- At billable (internal) location. i.e. a movement record must be added to move the horse to an internal location
- Has Nomination for Current Season (Only available in Stallion Module)
- Include all stallions (Only available in Stallion Module)
- Mares who have been covered in the current season. This is based on a Cover Input record recording when a mare was covered
Activating & Deactivating Vet App Access
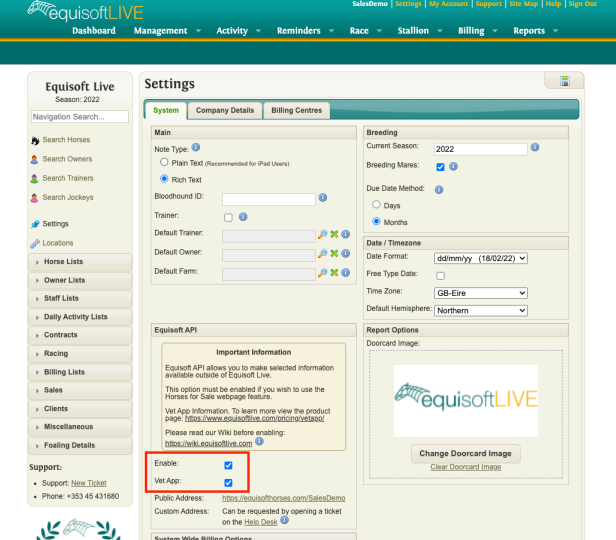
The Vet App is activated on your EquisoftLive account by default. Access can be controlled through the systems tab on the settings page. Both “Enable” and “Vet App” must be selected for the Vet App module to be activated, likewise both options should be deselected to disable the access.
EquisoftLive Activity Code Setup
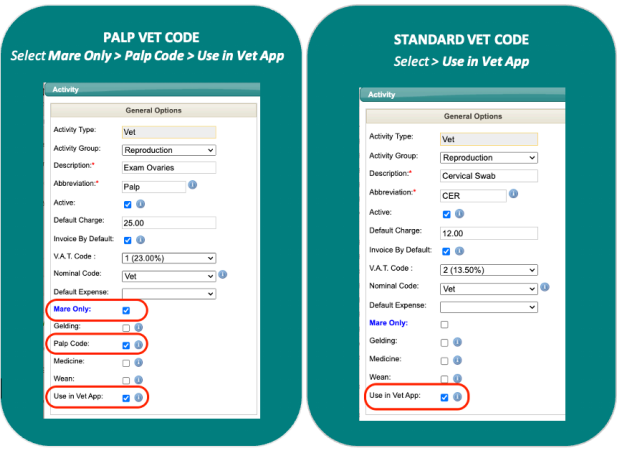
Check your TEASING and VET CODES are set up and activated within EquisoftLive. A checkbox is available in the Activity Code setup window to allow the user to specify which vet codes are available to use in the Vet App. You will require one PALP VET CODE for inputting detailed Mare reproductive examinations, the other vet codes can be set up as Standard Vet Codes.
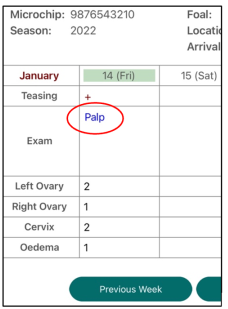
The “Abbreviation” column above is what is shown the Diary in the Vet App:
Installing the Equisoft Vet App
Visit the App Store on your Tablet/ Smartphone and search for “Equisoft Vet App” to download the latest version. Launch the Application. Once the Vet App is installed on your device you should see the Vet App icon as below:
Login
When you launch the Vet App you will be prompted to log in. The username and password are configured by your account administrator within the EquisoftLive portal so log in using your personal EquisoftLive account details in the following format: accountname\username e.g. equisoft\vet.
The login screen gives you the option of remembering your password.
Main App Screens
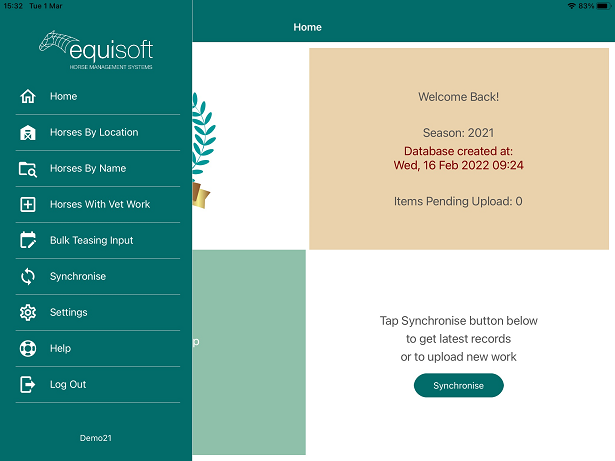
Menu
The main menu is accessed at the top left-hand corner. Currently the below items are included:
- Home - app home screen
- Horses by Name - search horses by name
- Horses by Location - search horses by location
- Horses With Vet Work - list of horses with vet work added on the app since the last synchronisation
- Bulk Teasing Input - list of horses by yard to enter teasing results
- Synchronise - upload work and get latest offline database
- Settings - application settings
- Help - create helpdesk ticket
- Log Out
Home Screen
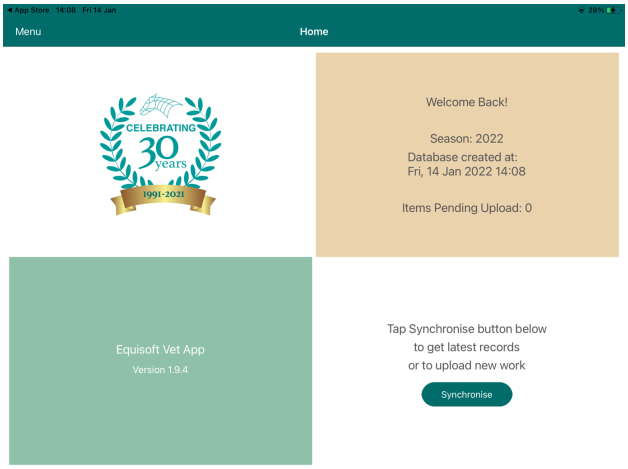
The Home Screen is split into 4 panels (this is the tablet view. Mobile device view will vary slightly):
- Top Left: Your logo (if applicable, please provide Equisoft with a high resolution logo image)
- Top Right: Details of when you last synchronised and the number of records waiting to be uploaded to server
- Bottom Left: Software Version and contact details for Equisoft
- Bottom Right: Link to the Synchronise screen to perform offline database download and upload (of work input on device)
Synchronise
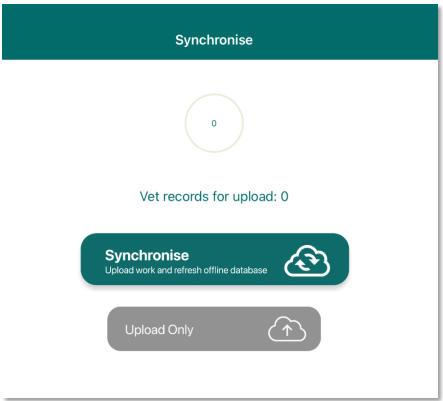
Before the device can be used an offline database needs to be downloaded to the device. This will take a subset of your main EquisoftLive Account (for example – it will only include veterinary history from the last three seasons). From the Home screen click on the "Synchronise" button on the bottom right panel:
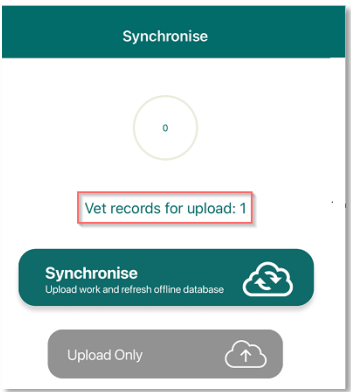
This screen has 4 sections:
- Progress Bar: This lets you know how long the offline database creation will take
- Vet Records: This lets you know how many Vet Records you have created on the device and are awaiting upload
- Synchronise: This will upload any records you created on the device and will download a fresh offline database from the EquisoftLive server
- Upload Only: This allows you to simply upload the records you created on the device, without having to wait for a new offline database to be created and downloaded
System Settings
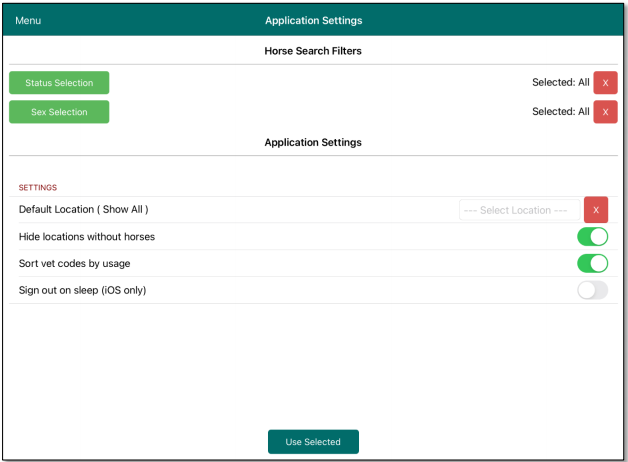
The System Settings window allows you to set your preferences for the App. You can specify the default horse Status and Sex preferences for the horse search.
- Default Location - this will default the horse search to the specified location only
- Hide locations without horses - this will hide locations that don’t currently have any horses on the Horse Search by Location screen
- Sort vet codes by usage - when inputting work the user can choose from a list of vet codes. The default order is in alphabetical order. This will put the most commonly used vet codes at the top instead
- Sign out on sleep - this will log the user out when the iOS devices goes to sleep
Horses by Location
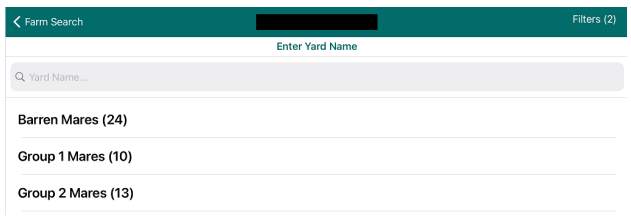
When you choose this option from the Menu you will see the following. If we have specified a default location in the System Settings above it defaults to only showing horses at this location:
If you wish to search on other locations click on the “Farm Search” button at the top left:
When you pick a location, you will see the list of horses there:
Note the “Filters” indication at the top right-hand corner. This lets you know that you have active filters in place. Clicking on this button will take you the System Settings screens if you wish to adjust this. Once you pick a horse you are brought to the Vet Diary.
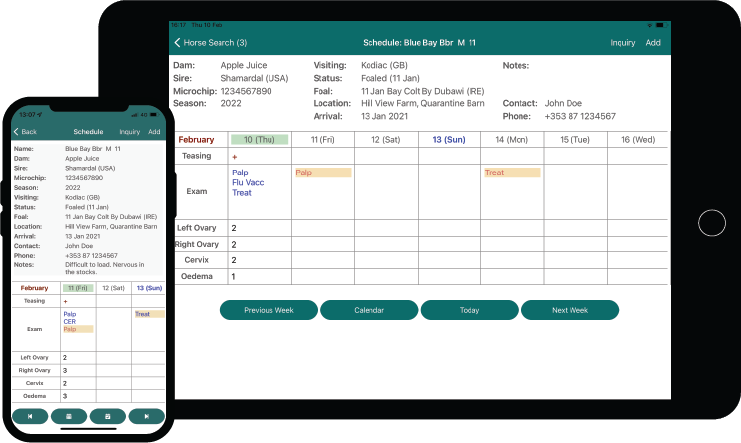
Vet Diary / Schedule
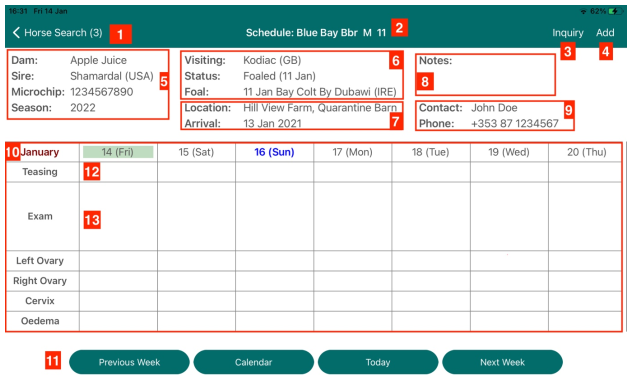
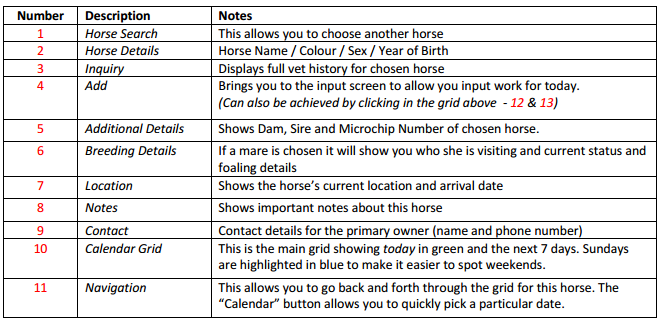
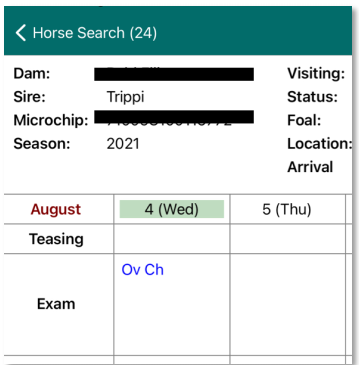
This is the main view presented to see the work performed for the chosen horse and to allow you to input work for today or plan work for future days. The main features on this screen are numbered below and detailed underneath the screenshot.
Inquiry
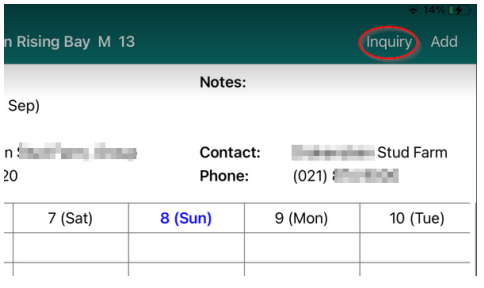
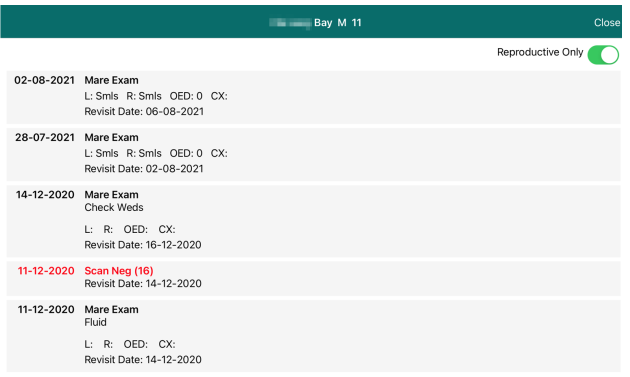
While in the main input window there is an “Inquiry” button in the top right corner:
By default, it will show reproductive items only:
Support
If you require support or need to report an issue, please select Help from the dropdown menu and submit a ticket.
Input Work
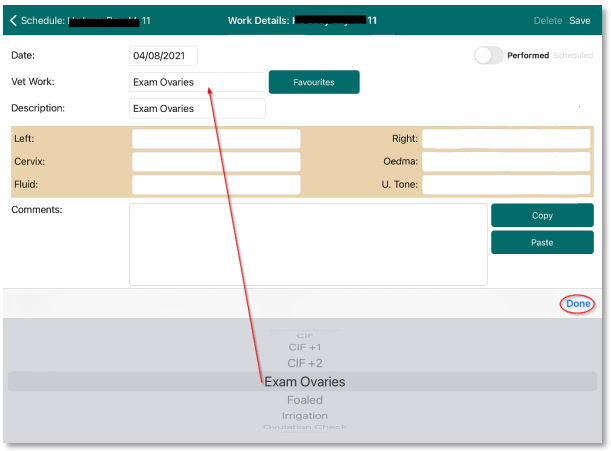
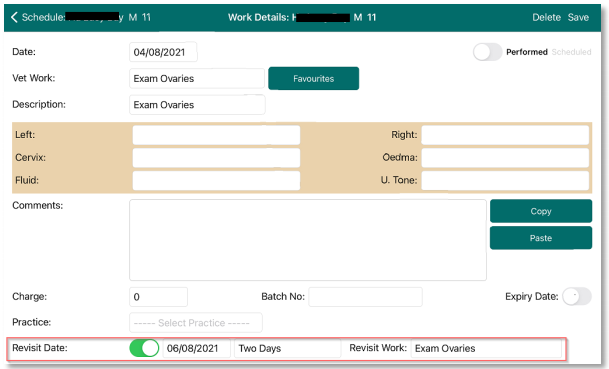
When the user chooses the “Add” button or clicks on the Diary grid the “Work Details” input screen appears as shown below. The user can choose from the list of vet codes as shown below (see the list at bottom).
Settings within the main EquisoftLive account allows the user to refine what vet codes get include in this list for selection. (See EquisoftLive Activity Code Setup).
In the System Settings for the App you can decide the order of the Vet code selection list: Alphabetical order or Frequency of Use Order.
When the details of the work have been input click on the “Save” button the top right corner to be returned to the Calendar grid:
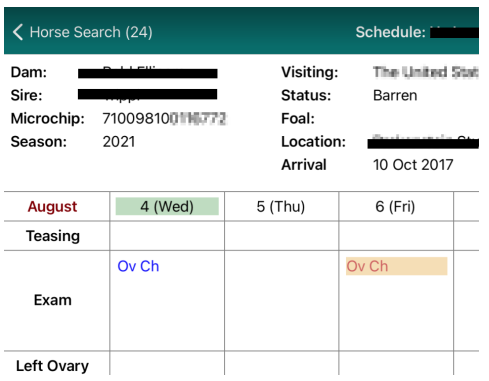
When inputting work, you also have the option of scheduling a revisit in a number of days. In this example below a revisit has been scheduled in two days.
You can see that the work input for today (4th August) appears in blue, with the schedule work for 6th August appearing in Yellow.
Synchronise Work
When the work has been input and you wish to upload the work from the device to the main EquisoftLive server you click return to the Menu (or Home screen) and click on “Synchronise”.
In the Synchronise window you will see the number of records ready to be uploaded and a button “Upload Only”.
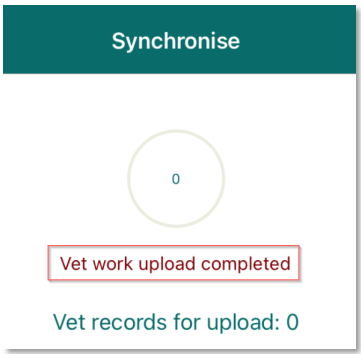
When you click on this it will take a couple of seconds to upload the record(s) you have input and you will see the status change to “Upload Completed”.
EquisoftLive Approve Vet Work
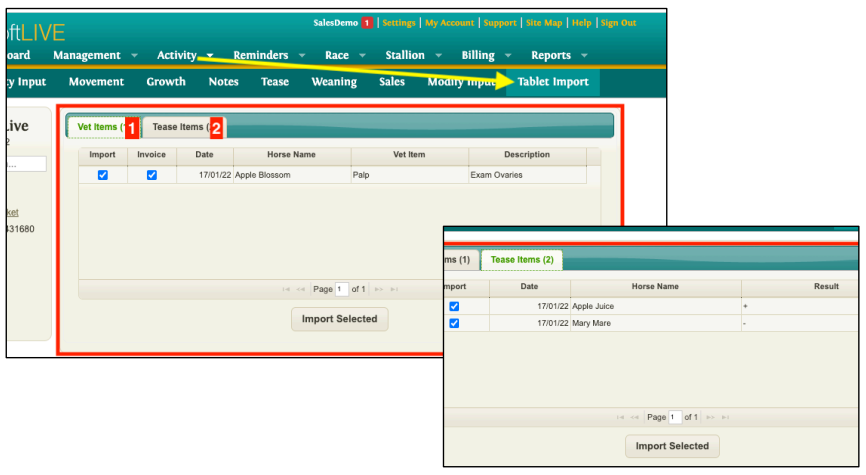
Within EquisoftLive the user can review all of the work that has been uploaded by the Vet App user. (The menu item is found under the “Activity” menu).
Both the Vet and Tease Items must be imported individually by clicking on the individual tabs 1 and 2 and Import Selected. By default, all the work that was uploaded from the Tablet/ Mobile has the “Import” flag ticked.
EquisoftLive Commit Vet Work
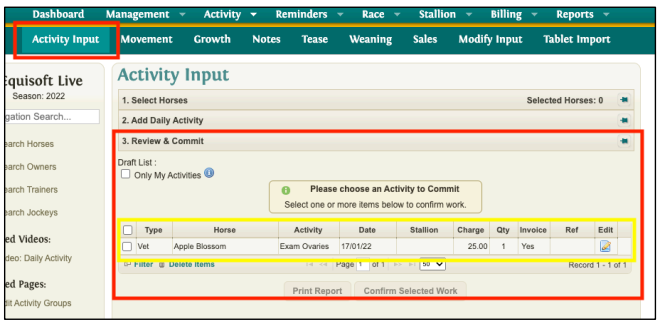
When the user clicks on “Import Selected” the Vet work is pushed to the Activity Input window. This work is now treated as any other work that has been input through this window. The user can edit the work if required and “Confirm” the work and commit it to the horse’s vet history record.
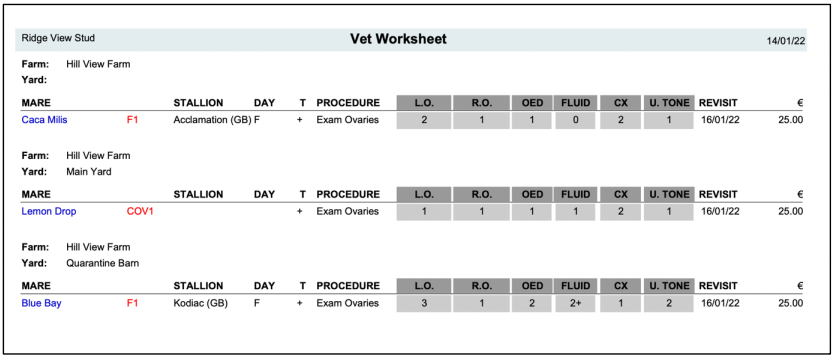
Vet Worksheet Report
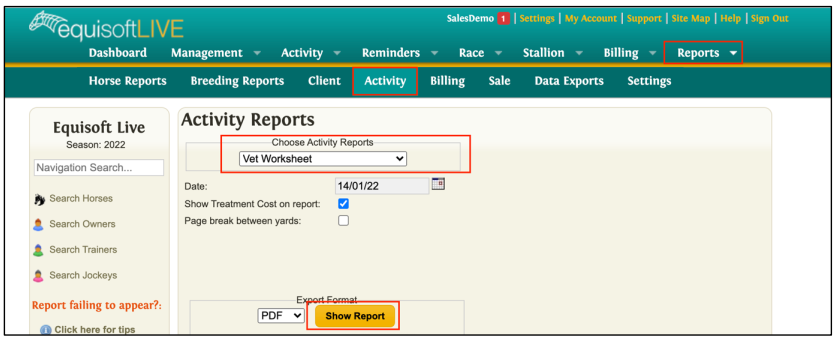
Generate a daily vet worksheet by selecting Reports> Activity> Vet Worksheet> Show Report. This report can be printed, downloaded and emailed if required.
